Pages

Wednesday, September 26, 2012

Farm House Table

 Usually I save the best for last, but I love this table!  So here are the afters before!


Don't you just LOVE the chopping block top, and the cute bench, and I LOVE the chairs! (what else is there right?)


After my husband and I got this table into our dining area (which was not an easy task it is really really heavy and I apparently am not as buff and I "claim" to be.)  I decorated it to take pictures and I am sad I am selling it.  Look how great it looks with my floors!! 

But I really love my other table and I don't think, actually I know, Devin will let me keep both.  So I am selling this beautiful table!


I love the lines of these chairs and the fun rivets, to add a bit of character!


Now for the Before's, Well they are kind of half way throughs.  I forgot to take before's, what's new?

After the top of the table was sanded down I stained it with Early American by Minwax.  


I love how this stain made the pine look so rich!  Once the stain was dry I applied 2 coats of Hard Wax. 

As for the bench, I built it MYSELF!!  Yes, I am quite proud of myself!  It is nice, sturdy and added so much character to this table! 


Once my bench was built I painted and distressed it to match the rest of the table!


This table is for sale, if you are interested please check my Furniture For Sale tab at the top of the page!

TTFN

Brooke

Saturday, September 22, 2012

1920's Waterfall Dresser

Sometimes I look at a piece, like this one and I am at a lose for words.  Believe me that never happens.  I always have something to say and then some!  But it is just beautiful, the pictures say it all!!


What to say, what to say.....

I am not always a huge fan of waterfall dressers, but I loved this one when I saw it!  All the of details bring this piece to life!


This piece is painted in a teal/blue with cream trim! 
 I really wanted it to looked old, since it is!  I distressed it with my sander and then antiqued it a bit more with Dark Wax.
I have waxed it all with a clear hard wax for extra protection.  As I know this is important (my kids try to destroy add character to my furniture.)


This dresser is for sale, If you are interested please see my Furniture for sale page!

TTFN

Brooke

Thursday, September 20, 2012

Year Recap

Wow, I can't believe it has been a year.  A whole year, and we are not moving ever.  I hope I never have to eat those words ;)

As I have been looking back over pictures there has defiantly been a lot of blood sweat and tears oh and LOVE put in to this house.  There is something so satisfying to say, "Yes, I did that!"  Our house is not done (with me it will probably never be done)  but it is closer!   I thought I would share a few of my favorite projects, or maybe the ones I am SO SO glad are done!


The outside was so much work.  When we bought the house we just thought oh we will do this and take that out and la la la....well let me tell you I NEVER want to do this again.


But I do love how it turned out!


Our master bath was our first completed room!  And I still love it!

Before:


After:


My favorite part about this bathroom is the vanity and simplicity.  

My Laundry room was probably the most NEEDED renovation.  My laundry room is a hall to the garage, and I don't ever do laundry, which made it very hard to use the garage door.  We needed organization!


The laundry room was probably the most challenging, only because I had a very long list of must haves and a small budget.  
 

Read the full post here

And then there is my daughters room
Before:


After


Read the full post here

But my favorite room is.......My living room
(before)


I really don't like living rooms, mine usually just collect dust, but not anymore.  Well, it still does collect dust but at least it gets used!


 I love my photo wall (post here)
I love my over sized desk and my plank wall (pics and tutorial here)
This room is so functional for us now and I love everything about it!

My most challenging area was the Dining Area and Kitchen I really felt out of my comfort zone putting this area together, but I LOVE IT NOW!!!!


And our last project, just finished, the half bath.


Full post here!

Wow, what a year it has been.  It is so fun to look back at the progress.  I want to say thank you to all of you who read and leave comments.  Remodeling is so stressful, sometimes the things that kept me going were the sweet comments, support, and love.  I read every comment and try to respond to all (I know I fail sometimes at that)  So thank you to everyone!!!

TTFN

Brooke


Friday, September 14, 2012

Comments

I LOVE all your my comments!  I read every single one and reply to as many as I can.  However, there are so many comments from readers with questions I would love to answer, but can't because they are a NO REPLY BLOGGER!!!!

So, today I set out to find an awesome tutorial on how to change that so I can answer your questions and keep in touch!

Click on the link below, it will take you to a great tutorial!!

http://jenniffier.blogspot.com/2012/08/google-profile.html

Let me know if you have questions, I did try this tutorial myself and it works great!!

TTFN

Brooke

Wednesday, September 12, 2012

Distressing with Vaseline

A few months ago I was talking to my friend about refinishing and she said, "Yes, I just finished my first vaseline piece of furniture."  I replied, "Wait!? What!?  You did what?"

After she explained to me how she distressed with vaseline it has been on my TO DO list for a very long time.  I hadn't come across the perfect piece of furniture until....

This headboard, it was actually a custom refinish, the lady I was refinishing it for wanted a rubbed look!  PERFECT FOR VASELINE!!!


So how do you distress with vaseline:
First sand your piece down and get it all ready for paint
Once it is ready add you vaseline where ever you DON'T want the paint to stick.  
It doesn't have to be thick just rub it on like you would on your lips.


Once you have the vaseline on paint away!  
As the paint dries it will crack where the vaseline is.  (As shown above) 
 Once your paint is dry take a rag and it will wipe right off!

You may want to run over the top with fine sand paper to make sure all the lose paint is off!


I did go back and distress in a few additional spots to add an antique look!


 TTFN

Brooke


Monday, September 10, 2012

DIY Chalkboard

I have been on the hunt for large vintage frames for awhile.  

Last week my daughters and I were wondering around DI (local thrift store) and there it sat all alone on a shelf.  It was just the perfect vintage frame, the right size and style!  JACKPOT!!!  
It sounds funny to say it that way...it might as well of called my name!


I love chalkboards and I have been wanting one above this chest for awhile.  I was so excited to get my chalkboard in this frame!!
I really wanted cursive writing ...... 
I  bribed my husband to write in cursive for me, I can't write in cursive.  I have tried for YEARS!

I love this quote and wanted it in my house to help remind me of what is most important.  
I  shorten it to fit, so here is the full quote

“Give your child a compliment and a hug; say, ‘I love you’ more; always express your thanks. Never let a problem to be solved become more important than a person to be loved. Friends move away, children grow up, loved ones pass on. It’s so easy to take others for granted, until that day when they’re gone from our lives and we are left with feelings of ‘what if’ and ‘if only.’ … “Let us relish life as we live it, find joy in the journey and share our love with friends and family. One day, each of us will run out of tomorrows. Let us not put off what is most important.” President Monson


If you want to make your own chalkboard you will need:
a frame
Hard Board
Chalkboard paint

After I found my frame I cut a scrap piece of hard board down to the size of the frame.  I used hard board because it is thin so it fits in the frame perfect.  You can use anything that will fit and can be painted!
After I cut the hard board down to size I painted it with Chalkboard paint, I bought mine at Lowe's.  Once it was dry I put it in the frame, secured it, and it was ready for writing!


TTFN

Brooke

Linking Here:
http://designdininganddiapers.com
http://frenchcountrycottage.blogspot.com

Wednesday, September 5, 2012

How I Distress

I always get excited when I find a piece of furniture with straight lines, they are my favorite to distress!!  I thought I would share some of my secrets with you!!


These chairs are pine, when I got them they were stained.
First I sanded them down until the clear top coat is off.  I then sprayed them with a latex paint (I have a professional paint sprayer I use, but if you don't painting with a brush works too).  I did NOT prime, I wanted the paint to be loose in some spots for distressing. 


After they were all painted I got out my sander.  This is a great project if you ever need to get some anger out!  
On my sander I have 60 grit sand paper, mainly because it was already on.  You can use whatever you want.  Remember the lower the grit the rougher the sand paper.  I sand as if I am sanding it to prep it for paint, so EVERYWHERE.  


Areas where the paint is loose will just come right off, like the back of this chair. 


With latex paint I have found if you FORCE an area to distress a lot of times the paint will ball and become sticky.

When distressing I also consider where the most NATURAL damage would occur and sand there more, like the edges, or the seat of the chair etc.

Paint colors: Yellow: Saffron by Clark and Kensington
                     Blue: Moderne Blue by Pratt and Lambert

I hope this helps!

Happy Distressing

Brooke

Tuesday, September 4, 2012

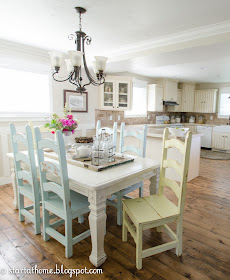
New Table Chairs

One of the best parts of blogging is watching something evolve.

Before pictures of my dining area here

This was my first table, I love pedestal tables, they are perfect for smaller spaces. My previous Dining area was very small, this table fit perfectly!

Our new house has a much bigger area so I sold this table and...


My husband found this table at the DI.  I loved all the details and decided to keep this table for myself, as the space was big enough to handle a bigger table.  When I sold the table above I sold the chairs with it.  So we were chair less for a bit.


 Until I got these chairs.  I actually traded a refinished table for these chairs and a different table.  I loved the chairs so much I am keeping them for myself!   I need to find chairs for the other table now, it just never ends :)


I love how bulky they are.  Look at the cute little ruffle on the front. 
 They are the perfect chair for my table!


I have always wanted different colored chairs, caption chairs, and my kitchen area needed a little more color.  Problem Solved!

I love the way these chairs distressed (tutorial ) 


My center piece is an Old Window with Burlap!  It makes the perfect frame!

TTFn

Brooke

linking here:


http://www.thevintagefarmhouse.com/
http://savvysouthernstyle.blogspot.com/
http://www.southernlovely.com/
http://primitiveandproper.blogspot.com/
http://raegunwear.blogspot.com/

Saturday, September 1, 2012

A Desk and Headboard

We just barely got new internet...and it is lightening fast.  But I guess anything is faster than Dial Up....I know I know get with the program right.  I usually start a download and leave to get something else done, as I was getting up today....TADA they were done!  WOW, what to do with all this free time!

Have you ever noticed behind every piece of furniture there seems to be a story? My little cuties and I set out on a road trip to get this desk.  When we were almost  there my 3 year old says, "mom where are we going?  I just don't like it and I want to go home.  I don't like this road trip at all."  
Apparently our road trips are not fun anymore :(  I bet ice cream will do the trick next time.

When I get low on furniture I usually search the classifieds and line up as much furniture as I can in a certain area.  It is fun, well to me, to get out and go collect furniture.  I always like to look for pieces with a little bit of their own character and charm.  


I painted my table chairs this color (pics to come soon) and I love the color so the desk is the same color.  It is such a clean happy color!  It almost makes you want to do homework!

I sprayed this piece with Pratt and Lambert Paint (I forgot the name) and distressed it.  It has new satin nickel hardware on it, the original hardware was boring.


For the Queen/Full bed...
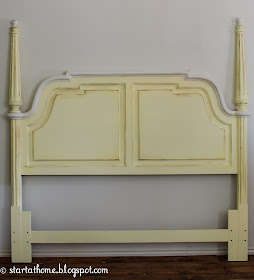
I love the details of this bed and I really wanted them to stand out so I added some white to help accent the molding on the top.  This is one heavy head board. I thought I was being tough and could get it in my truck by myself, well I took both of us out in the process.  I am sure everyone was laughing at me!


I have the rails for this headboard, it can be a full or queen.
I am selling both the desk and the headboard.  Check out the "Furniture for Sale" tab at the top of the page if you are interested!

TTFN

Brooke