Wednesday, July 31, 2013

Link Party #8

Hooray it is that time of the week!!  Paint Party!!  
I have to say I really look forward to this party every week.  As I plan out my blog posts I always get excited for this one.  I have loved seeing everything everyone is up to, meeting new friends, getting new ideas, finding little trick... I JUST LOVE IT!!!


Here is my Paint Project this week, old record player turned Cabinet!  I finally mixed up some chalk paint...LOVED IT!!!


Look at this Coffee Table by Pneumatic Addict, she even made the crates!  Beautiful!!


What is there to say about this Awesome coffee table by Sawdust On My Boots?


This Turquoise table is so fun, as you know I am a sucker for turquoise!  I love the 2 tones Company of 7 used!  Beautiful!


Here is my Paint Party Pinterest board, Check out all the Features from the Paint Party!!

Please follow the rules for the link party, I promise to keep it short
1) Only paint projects, if it somehow involves paint you can link up
2) Link straight to your post not your blogs home page
3) Follow me somehow, I am not picky!
 photo email_zps9d1c6b12.png photo instagram_zps88445fe4.png  photo fb_zps5d3a02b1.png  photo twitter_zpsb5c638e9.png  photo pinterest_zps0cdb4597.png Follow on Bloglovin 


4) Link back to this party using my address or my button on the sidebar.  
                               If you don't link back I wont feature you.
5) I love to Feature your awesome work, I will pin all featured projects, and I also will    share a few on my Facebook page each week!
6)Visit others, make new friends!!7) Have fun, and THANK YOU for joining!

Tuesday, July 30, 2013

Tuesday's Tip #1 Using Vaseline to Save Your Hardware

Every time I paint a piece of furniture I make a mental note to myself about some odd thing I learned either from trial and error or I ran into a problem and probably found the answer on one of your blogs! 

 I always promise myself I will share it (I usually even take pictures) but somehow it never makes the cut for the blog post.... So, I am starting Tuesday's Tip in hopes to compile all those random tricks and tips that make painting a little easier!  

The best part is, if you have a tip or trick you have learned SEND it to me!  I would love to feature you on Tuesday's Tip and hopefully we can all learn TOGETHER!!


My First Tip is Using Vaseline!

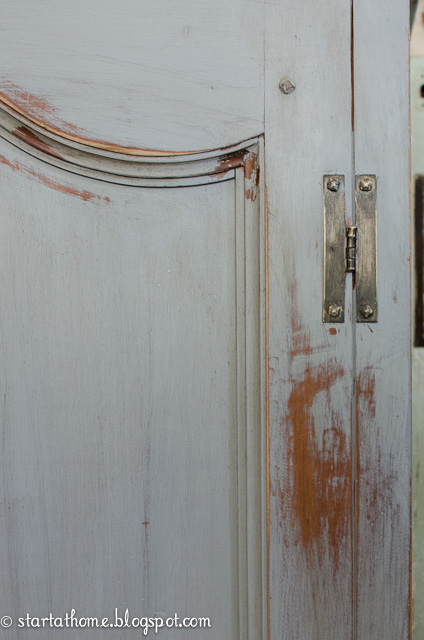
You may remember this little cabinet I posted last week.  See what look to be hinges on the front?  They are not actually functioning hinges and are nailed on their very very well.  I tried to get them off and realized soon enough I was going to ruin them if I continued to pull and tug.  I didn't want to paint them the same color as the cabinet as I love the character they bring so....


I pulled out the vaseline.  I applied it every where I didn't want the paint to stick.


As you can see the paint will not stick where the vaseline was placed.  After the paint dried, I used a wipe to rub the area I applied the vaseline.


TADA, I have beautiful paint free hinges!


If you have a tip you have used to make painting easier SEND IT OVER to Brooke.n.larsen@gmail.com

TTFN

Brooke

Monday, July 29, 2013

Carpet AT LAST!!!

Last December we started the Renovation of the basement.  Here is the Lovely Mess it was before.  
Notice the flooring, it was painted cement with flex in it, very cold on the toes!


Here is the After:
My husband has claimed this area as his man cave, as to why there are wires hanging everywhere, they are waiting for surround sound!


When we first moved in this basement was in bad shape.  The walls were dinged up and the moldings had seen better days.   We were going to have someone come out and mud and tape the basement again, but that is oh so expensive.  Instead we textured the walls and hung bead board!   I love the texture on the walls, it adds a richness to the room and when my daughters ding it I can just touch it up with a bit of paint and you can't even tell!!  The bead board hid unwanted patched holes on the walls from moving electrical and speakers!

And I LOVE the Bead Board ceiling with the beams and crown molding!  I found a few pictures of us putting up the bead board!  I will have to make a tutorial for all those who want to attempt it.  It is one of those tasks where you are so happy you did it and you love the outcome but the thought of doing it again is kind of tiring!  We had holes in our ceiling as well, and if you have ever tired to patch a hole in the ceiling you know it is very hard to match textures so we decided to give the bead board ceiling an attempt.  The outcome was better than I expected, and the best part is our basement doesn't feel like a basement!


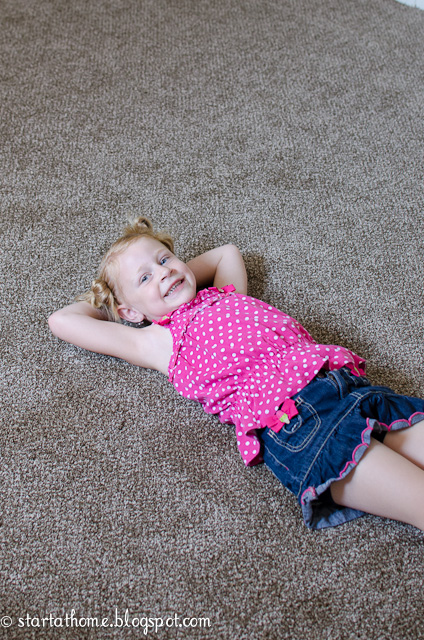
As you can see my daughter is thrilled to have carpet, I love the warmth carpet brings.  We decided to go with a Level 3 Polyester Blend carpet.  I searched and searched for carpet and decided on polyester because it is so soft and they say it is a 8 year carpet, I am sure I will be ready for a change by then.  Nylon carpet lasts longer but it isn't quite as soft and it is quite a bit more expensive.
I went with a level 3 because it is thicker but also holds up a little longer.  I wanted a carpet with a little bit of flex in it (different colors) to help hid crumbs.  Because, I must admit I don't get around to vacuuming everyday!
Right now going up my stairs to the 2nd floor I have a berber carpet (the short stuff) and we are not friends most days, I vacuum and with in hours it appears as though I never vacuumed, it shows everything and with 2 active girls trying to keep up is a full time job.  In  our previous home we had shag carpet and while it hid crumbs well, as soon as you started to walk on it the carpet would lay down which drives me crazy, so I found a carpet in between the 2 and so far I am very happy with it!  


I hope your MONDAY if off to a wonderful start!!

TTFN

Brooke


Friday, July 26, 2013

The French Provincial Record Player Turned Storage Cabinet

Before:
When I picked this one up they had already gutted it!!  Bonus!!


After:


I finally used homemade chalk paint, and I am happy to say I was pleasantly surprised but the outcome.  I think it sticks much better than other chalk paint and it holds up better against water!
Here is the Recipe I used

Plaster of Paris
3 parts paint
1 part plaster of paris
water

Combine water with Plaster of Paris, adding a little bit at a time until you get a nice smooth consistency. Add more water to break down the powder.  Once the powder has dissolved in the water add to your paint and MIX

I really did not stray from this recipe!  It worked awesome, just a note, this paint doesn't store very well unless it is air tight, so either work really fast or store in a mason jar.


I love how well it distressed, I also used Vaseline to distress this piece (tutorial here)
Once it was distressed I applied Annie Sloan's Clear Wax and then Brushed on a touch of her dark wax!


The inside is painted with Benjamin Moore's White Dove cause that is my favorite ivory color and I love the contrast!


Fun little storage on the top!


I left this plaque original as a fun reminder of what this piece used to be!


This piece is for sale!  If you are interested please see my Furniture For Sale tab!

TTFN

Brooke

Don't forget to check out my Paint Party going on NOW!!!

Linking Here

Miss Mustard Seed
Redoux Interiors
PoPP
French Country Cottage

Wednesday, July 24, 2013

Paint Party #7

Who is ready for another Paint Party!  I have to admit, I LOVE having this, it is so fun to see everyone's creations!  It is so hard to pick just a couple features it each!  Thank you Thank you toeveryone for linking up!


First up my Paint Project: 
Twin Bed Frame Turned Bench, and of course a cute little model!  (full post here)


Look at these beautiful nightstands by Created Inspire!  I love the details, and the color, and the glazing and well really just everything!!


What is there to say about this Beautiful Nursery from Picked and Painted?  AMAZING!!  
(see the cute baby in there? CONGRATS Helen!)


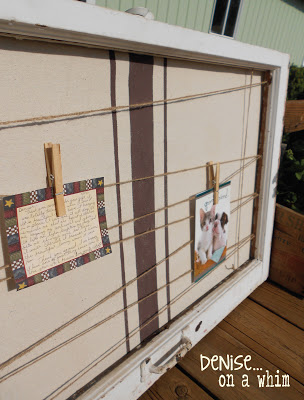
I don't know about you but whenever I see an old wood window I pick it up whether I have a use for one or not.  Needless to say I have a few in my garage.  Thank you for the GREAT idea Denise....on a whim.

Please follow the rules for the link party, I promise to keep it short
1) Only paint projects, if it somehow involves paint you can link up
2) Link straight to your post not your blogs home page
3) Follow me somehow, I am not picky!
 photo instagram_zps88445fe4.png  photo fb_zps5d3a02b1.png  photo twitter_zpsb5c638e9.png  photo pinterest_zps0cdb4597.png Follow on Bloglovin  photo email_zps9d1c6b12.png

4) Link back to this party using my address or my button on the sidebar.  
                               If you don't link back I wont feature you.

5) Have fun, and THANK YOU for joining!


Twin Bed Frame Turned Bench!

Oh, what to say about this bench.  Except I want it.  This is the hardest part of my job, I hate to let things go sometimes, and my daughter looks so cute on it!!  She always begs to be in the pictures, my little model in action!


This bench was a custom order for a family friend.  Her daughter is getting married on Friday and instead of a sign in book they are having their guests sign this bench.  What a fun idea!  I hope to get pictures of it after it is been signed!

Unfortunately I didn't have a bench laying around, lucky for me I found this twin bed frame, way easier than starting from scratch!


This style of bed frame is not the most popular thing right now but they sure make beautiful benches!


Since this bench is going to be signed I didn't do anything too special to it.  I had this paint color matched to her colors, after it was painted I slightly distressed it to bring out some of the details.   We decided to not put the clear top coat on until after it has been signed so hopefully the marker doesn't smear and sinks in a little better.  After the wedding we will seal it all up!


Don't forget to come back tonight at 8 pm MST for the Paint Party!!

TTFN

Brooke

Monday, July 22, 2013

Update Your Dated Fixtures!

Yes these are the awesome fixtures that were originally in our basement, complete with LOTS of dust.  


New light fixtures are so expensive these days I thought I would give the fixture a little facelift before kicking it to the curb.  I scrubbed the glass and spray painted the base with Rustoleum in Oil Rubbed Bronze.  It really helped wouldn't you agree but they still were not exactly what I was looking for.  


And so I added a lamp shape and some jewels! LOVE!


Here is a little peak from under the lamp shade.  I simply took the glass off pushed the lamp shade over the light bulbs.  I did not alter the light fixture at all.  I have to say in all of my refinishing this was the EASIEST fix ever.


And I can't forget my Chandelier that hangs in the guest room.  
My neighbor was taking this one down and was kind enough to think of me.  
Jackpot, and I love everything about it!


I hope everyone had a wonderful MONDAY! 

TTFN

Brooke

Linking Here:

LinkWithin

Related Posts Plugin for WordPress, Blogger...